
Your email address is one of the most valuable things you own online — and most of us hand it out like confetti. Every online shop, competition, newsletter, loyalty card and “sign up to see the price” box gets the same address. Then, months later, the spam and marketing floods in and there is nothing you can do about it. You can’t exactly change the email address your bank, your family and your work all know.
But what if you never had to give out your real address in the first place? That’s exactly what an iCloud email alias lets you do — and it’s already built into the Apple account you own. Here’s how it works, and why it’s one of the simplest ways to take back control of your inbox.
What is an email alias?
An email alias is a second (or third) email address that quietly delivers into your same iCloud inbox. Mail sent to the alias lands right alongside everything else — you don’t need a separate account, a separate password, or a separate app to check it.
Think of your main iCloud address as your home phone number, and an alias as a redirect that rings the same phone. The caller dials the alias; it rings through to you. And because it’s just a redirect, you can pull the plug on it whenever you want — without touching your real number.
The real power: you can switch it off
This is the part most people miss. An alias isn’t just a spare address — it’s a tap you can turn off.
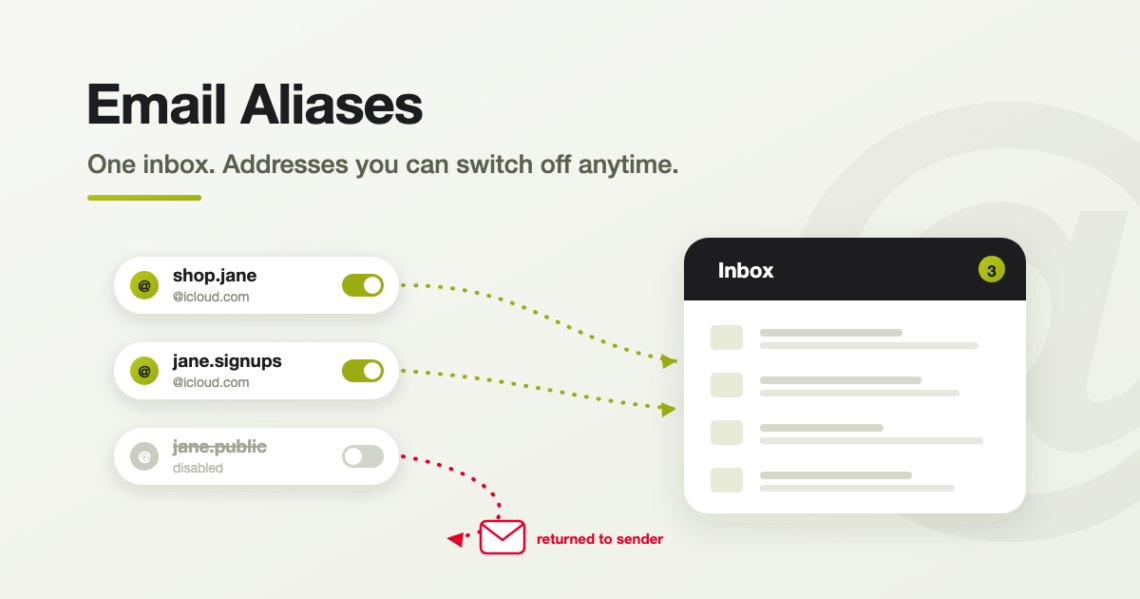
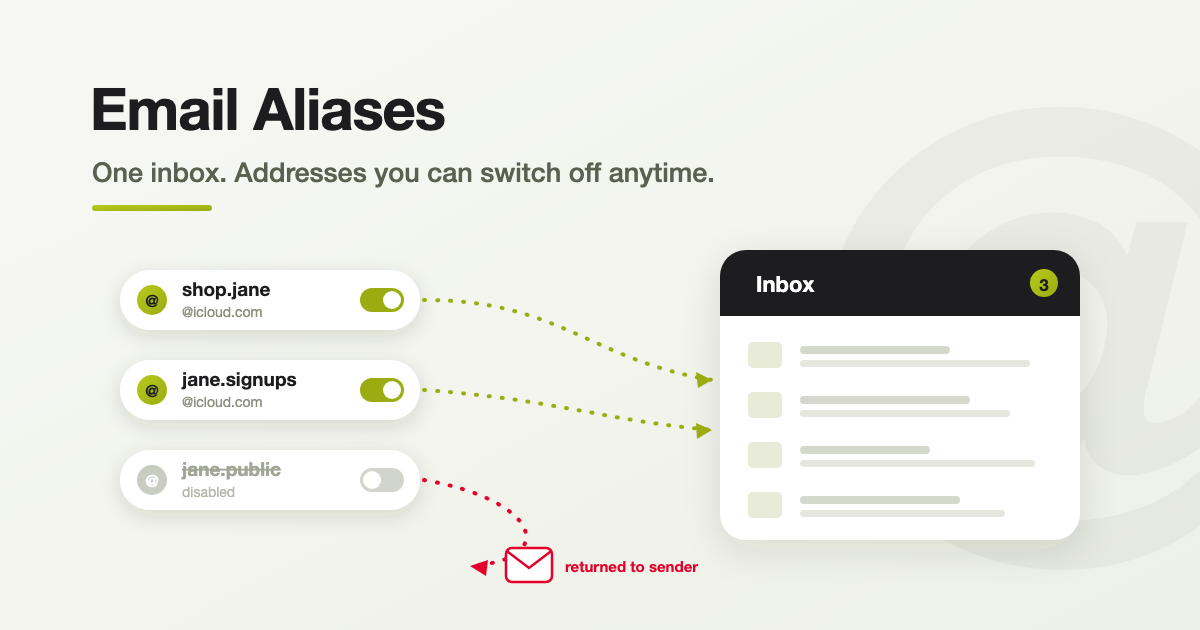
Say you use an alias like shop.jane@icloud.com for online shopping. Six months later that address is drowning in marketing emails and the odd bit of spam. With a normal email address you’d be stuck. With an alias, you simply disable it or delete it — and from that moment, any email sent to it is bounced straight back to the sender. It never reaches you again.
Your real iCloud address stays private and untouched. You’ve effectively cancelled one address without disrupting anything else in your life. That’s the control an alias gives you.
Alias vs Hide My Email — what’s the difference?
Apple offers two similar-sounding tools, and it’s easy to mix them up:
- Email aliases — up to three addresses you choose yourself (for example
jane.deals@icloud.com). Great for addresses you’ll reuse and want to remember. Available to everyone with an iCloud Mail account. - Hide My Email — part of a paid iCloud+ subscription. It generates a fresh, random address (like
x9k2mq@icloud.com) for every website, so you can create a throwaway one for each sign-up. Perfect for one-off use.
This article focuses on email aliases — the free, choose-your-own option built into iCloud Mail.
The ground rules
- You can create up to three @icloud.com aliases.
- Each alias name must be between 3 and 20 characters.
- Disabling an alias is temporary — you can switch it back on any time.
- Deleting an alias is permanent. If you already have three and delete one, you must wait 7 days before you can create a new one.
- An alias can’t be used to create a separate Apple Account.
How to create an alias
- On a computer, go to icloud.com/mail and sign in with your Apple Account.
- Click the Settings button at the top of the Mailboxes list, then choose Settings.
- Go to Account, then select Add Alias.
- Fill in the details:
- Alias: the text before @icloud.com — this becomes the address.
- Label: a name that helps you organise your aliases in the list.
- Full Name: the name that appears in the “From” field when you send from this alias.
- Select Create. Your new alias is ready to hand out.
Sending mail from an alias
When you write a new email, you can choose which address it comes from — your main address or any alias — using the “From” field. That means you can reply from the same alias someone contacted you on, keeping your real address private.
Turning an alias off (temporarily)
Getting a bit much from one alias but not ready to bin it? In Settings > Account, select the alias, tick Disable alias, and save. Mail sent to it will bounce back to the sender until you switch it on again by un-ticking the same box.
Deleting an alias (permanently)
Done with an address for good? In Settings > Account, select the alias and choose Delete alias, then confirm. From then on, anything sent to it is returned to the sender. Remember the 7-day wait before you can create a replacement if you were already using all three.
Smart ways to use your three aliases
- A “shopping” alias for online stores and loyalty programs. When the marketing gets out of hand, disable it — your real inbox stays clean.
- A “sign-ups” alias for newsletters, competitions and one-off downloads — the addresses most likely to end up sold on or spammed.
- A “public” alias to put on your website, social media or a for-sale listing, so your private address never appears in public.
If any one of them starts attracting spam, you’ll know exactly where it came from — and you can shut it down in seconds.
Frequently asked questions
No. Every alias delivers into your one iCloud inbox. There’s nothing extra to check.
They’re returned to the sender and never reach you. That’s the whole point — you control whether the address accepts mail.
Up to three @icloud.com aliases at a time, in addition to your main address.
Deletion is permanent and the name may not be available again. If you had all three in use, you’ll also need to wait 7 days before creating a new one, so delete with intent.
Need a hand setting this up?
Email aliases are one of those small Apple features that make a big difference once you know they’re there. If you’d like a hand setting them up — or you want to get more out of your Apple devices generally — the team at Geekworks in Coorparoo are Apple Authorised specialists and we’re always happy to help. Pop in or give us a call.